Thursday, October 25, 2012

Project Luke's Escape: Luke's Room (Final)

Hi!

You might remember me posting last week regarding my involvement in Project Luke's Escape.  If you haven't, you can visit at http://reynantem.blogspot.com/2012/10/shading-texturing-lighting-and.html

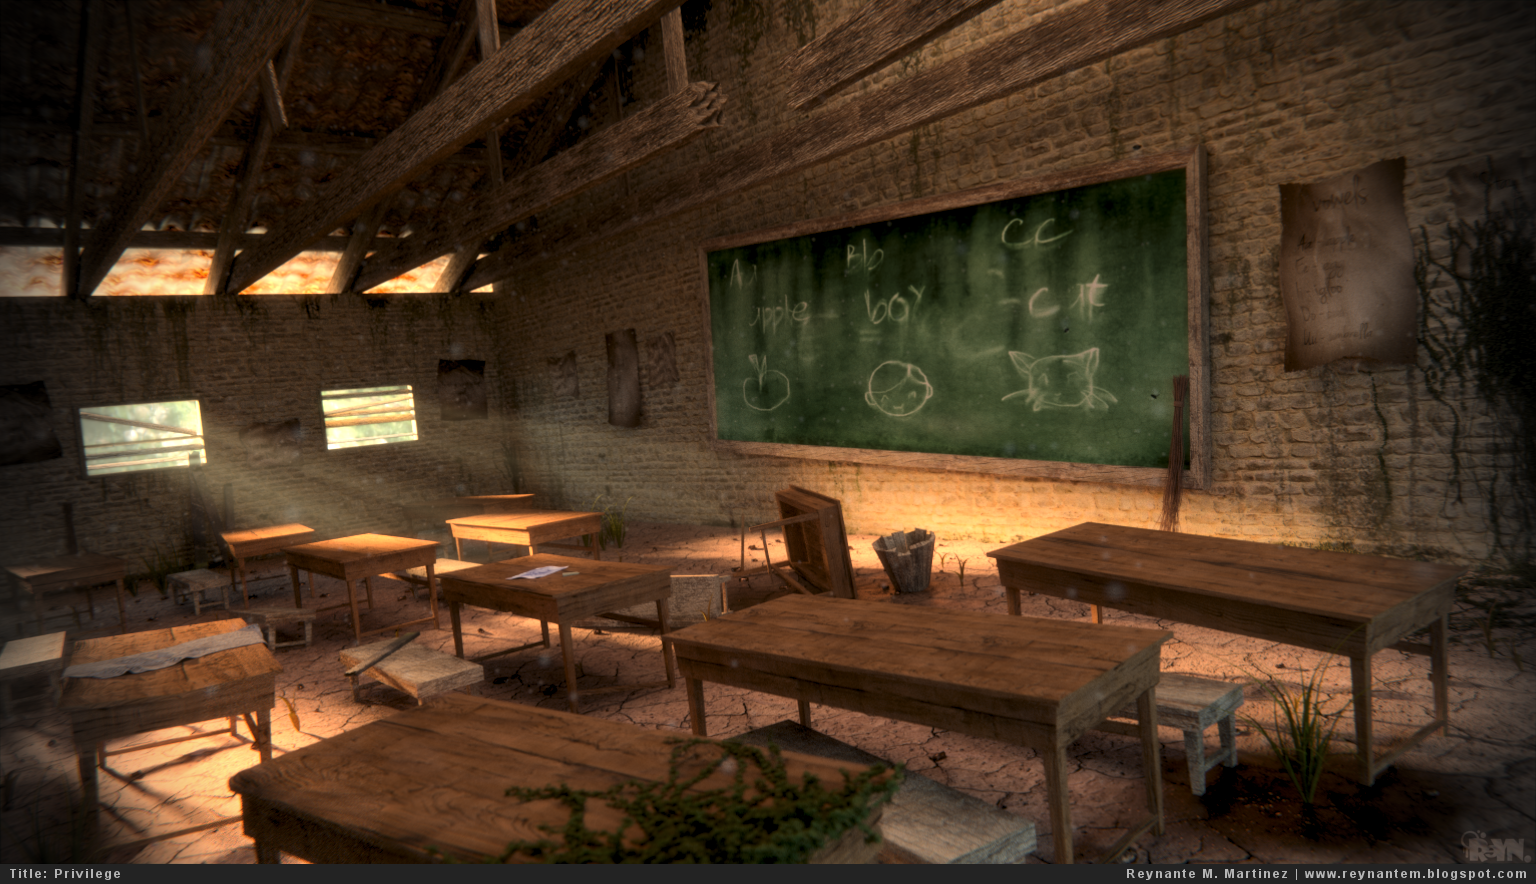
Well, here's the final version of the room we had been working on:

(click to enlarge)
We hope you like it as much as we do and thanks so much for viewing!

Shading, secondary texturing, lighting, and compositing by yours truly.

Don't forget to drop by our website at http://www.lukesescape.com for more info and to check out who are the people behind the project.

In addition to that, we'd appreciate it if you can check our Facebook page as well at https://www.facebook.com/LukesEscape

-Reyn

Wednesday, October 24, 2012

Work In Progress: 2012-Oct-24

Hi, everyone!

Here's another update on another piece I'm working on for quite a long time now.

Can't wait to show you the final render and have your comments and suggestions about it. :)

(click to enlarge)


Until next time.

Thanks for viewing!

-Reyn

Monday, October 22, 2012

Shading, Texturing, Lighting, and Compositing: Luke's Escape

Hi, everyone!

A couple weeks ago I was invited to join Project Luke's Escape, a short film about a young boy, his dream, and his journey.  Since then, it was one hell of an experience working with such talented artists! I've learnt a ton of stuff I couldn't have learned elsewhere.

Anyway, to cut my babbling, here's my latest progress on one of my assignments - Luke's room:

(click to enlarge)

Made with: Blender 2.64 and GIMP
Rendered with: Blender Internal and Cycles

I hope you like it! Be sure to check out what the rest of the team is up to and stay tuned with more updates from the film.

Project Luke's Escape website: http://www.lukesescape.com

Thanks for viewing.

Until next time, see ya! :)

-Reyn

Tuesday, October 16, 2012

Privilege


Inspired by my teaching period in one of the universities here in our country, the life in the barrios, the heart-breaking poverty that some our fellows are experiencing, and by the realization that many people and families would sacrifice a fortune just to get educated.


Conceptualization started late September and I'm very happy that this is finally done. :)


(click to enlarge)

Made with: Blender 2.63, Blender 2.64, Darktable, and GIMP

Rendered with: Blender Internal and Cycles


And I wouldn't want to leave this without making a night version:

(click to enlarge)


Plus here's a video showing the transition of both:


Thanks for viewing! I'd love to hear your thoughts and comments on this. :)


-Reyn

Wednesday, October 10, 2012

Work in Progress: 2012-Oct-10

Hi, everyone! It's been awhile since I had an update.

Been quite busy with tasks here and there.  Anyhow, I still managed to somehow create some pieces that fulfills my inner desires and stories.

Below is a screenshot from the latest personal project I'm working on, title undisclosed.  Been working intermittently on this for almost three weeks already and I'm glad to say it's almost coming to a completion; then I can move on to other stuff.

(click to enlarge)


What do you think? Could you guess what the title will be?

Until then.  Thanks for viewing! :)

-Reyn

Thursday, October 4, 2012

Blender 2.64 Released and a Test!


Yes, yes, yes!!!

Blender 2.64 is released! With it comes a whole bunch of bug fixes and more goodies, some of which I tested and was mind-blown for real.

Go grab your copy now and experience the same feeling that I had, well, have.

http://www.blender.org/development/release-logs/blender-264/

Here's a test I did with the sweet new Keying Screen Node (http://wiki.blender.org/index.php/Dev:Ref/Release_Notes/2.64/Keying), the green screen image courtesy of the Mango Open Movie Project (http://mango.blender.org/):


(click to enlarge)


I now feel like a child just receiving his Christmas gift wish. :)

Thank you so much, Blender Foundation, developers, donators, supporters, and the entire Blender community! You make this application and the world a better place to live in.

See that brain over there on Blender 2.64's splash image? That's us, the Blender community and for whatever we will be and whatever Blender will evolve to.

Thanks for your time.  Happy Blending!

^_^

-Reyn


Monday, October 1, 2012

HDR and LDR Lighting Workaround


***

UPDATE:

I recently received great feedback from Dewald Swanepoel (http://www.theemptyroom.co.uk/) and it is very very useful!

He mentioned enabling 'Sample as Lamp' under 'World' context then 'Settings' tab.  It does make wonders and I'm quite surprised by the results I got! Increasing the map resolution will give you less noise on your renders.  This and the 'Filter Glossy' (under 'Render' context then 'Sampling' tab) option is indeed a valuable tandem.  Check the screenshot below for a quick reference:

(click to enlarge)


Thanks, Dewald!

-Reyn

***

On the meeting last Saturday on Luke's Escape, there had been a discussion regarding the use of HDRi images for lighting one of the scenes.  Undoubtedly, HDR images are very powerful tools in creating realistic renders due to a couple of reasons.  However, they often demand more resources to generate a decent output.

On the renders you'll see below, there were no external lamps/emitters used to illuminate the scene, it's only using the World's Environment Texture and controlled via the 'Strength' option.

You'll also notice from the Waveform monitor that some details on the LDR (.tif) image are clipped (but not much) as a result of converting down the image's bit depth from HDR to TIFF format.


  • HDRi pros:

    • more dynamic, deep, and realistic lighting
    • no need for high Strength values to increase lighting intensity
    • better contrast, tonality, and color depth
    • light source from HDRi is simulated and creates realistic shadows
      • noticeable when animating the Environment Texture's rotation mapping


  • HDRi cons:

    • noisy at relatively average amount of rendering samples
    • heavy on memory and file size
    • relatively slower render time


  • Workarounds:

    • convert HDRi image to LDR (e.g. PNG, JPG, TIF, etc.) and use it as you would the HDRi image (as World Environment Texture)
      • you can open the image with Blender's Image Editor, check the image size, then save it as other file formats
      • or better, use the Tonemap node in Blender's Compositor to tonemap the image and maintain as much color tonality as possible and avoiding too much color clipping
    • increase the World Strength to emulate the HDRi's strength
    • to fake the shadowing received from HDR images, use lamps/mesh emitters instead
    • color grade the contrast effect that you get from an HDRi workflow if you choose to use LDR images
      • or you can adjust the Exposure settings found under 'Render' context then on 'Film' tab

HDR image lighting
(click to enlarge)


LDR image lighting
(click to enlarge)


Tone-mapping
(click to enlarge)


Rendered with: Cycles
Rendering Samples: 500


More info and references:

http://en.wikipedia.org/wiki/High_dynamic_range_rendering

http://en.wikipedia.org/wiki/High_dynamic_range_imaging

http://www.pauldebevec.com/Probes/

http://morecycles.blogspot.com/2012/01/hdr-texture-sampling-pt-1.html


Thanks for your time! :)

-Reyn