This test has been sitting in my hard drive for quite a long time now, I feel it must be shared. I had a discussion with my friend Brett Hartshorn regarding dynamic mesh LoDs (level of detail) and dynamic texture LoDs. And I just thought, out of curiosity to build upon his idea and try to generate a similar scenario inside Blender's interface itself, harnessing Blender's flexible drivers system.
You can find more about LoD (level of detail) here in Wikipedia http://en.wikipedia.org/wiki/Level_of_detail
Another useful link (credits to Jude Jackson) from Pixar http://graphics.pixar.com/library/StochasticSimplification/
To those who are interested to tinker around with the setup, you can download the .blend file here http://dl.dropbox.com/u/9701519/blender_mesh_lod.zip
7 comments:
I'm no coder but also thought about texture LOD in an abstrace way:
STEP 1 (manual) = Unwrap meshes, create biggest texture, then resize (for each texture) 4 different sizes (Big,med,small,tiny).
STEP 2 (procedural) = For each frame calculate camera distance from each unwrapped mesh, and based on max/min distance values, assign the different texture sizes to the unwrapped mesh.
This concept is probably flawed, as i'm not sure if this can be done at all, but its sure worth investigating..
In regards to your question about texture LoD - isn't that what Mip Maps are for? And as far as I know, they are already implemented in Blender since forever.
http://www.facebook.com/groups/135740176501490/201064836635690/?notif_t=group_activity
We've been trying something that's close to the same.
Ever Hobbes: Yes, I believe, in a way, Mip Maps does do this. However, it would be better if we could have a way to drastically reduce the size and quality of the textures, probably by fractions like 1/2 1/4 1/8 and so on. And instead of storing the textures, it is swapped, thus more space is freed from the disk, increasing performance.
Nathan Salapat: Wow, thanks! I'll keep myself updated on the group status. Thanks for sharing.
Luke: Thanks for the tip. I'll definitely tinker around that. ;)
-Reyn
Great setup, thanks
Raimon
Great work with the LOD system in blender!
I've done a tweak to your work and I wanted to share it with you.
The LOD is applied over the SubSurf (the level is limited with the python equation used in the driver).
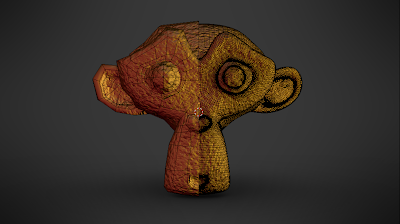
Also the object (Monkey) has 3 custom properties:
LOD influence: Is the same multiplicator you hardcoded into the Driver curve. 0.3 in your file. So now the Driver curve is 1:1, and there is no need to worry about it.
LOD max level: The maximum level for the display and render values in the SubSurf.
LOD start: The maximun distance for the maximum detail. This means, if this value is set to 5 the camera can be betwen 0 and 5 blender units and you will get the maximun subsuf level.Above 5, the subsubf level will decrease.
Using properties the user doesn't need to use the (hard) driver editor.
To try the file just move the camera (there is no empty in this scenario). The movement is limited to X axis, but I've tested it in all axes with proper results.
Anyway I see 3 problems here:
The implementation is absurdly complicated (or tedious) for a large set of objects. Maybe an add-on could automatize the process of creating (or deleting) the driver with just one switch button.
I suspect the subsurf level 0 should not be used, cause the gap between level 0 and 1 is always too much evident. So 1 should be the lowest level.
The "distance" between objects is really bad calculated in blender. I'm afraid it's calculating the distance between object origins. We should be able to calculate the distance between the camera (its origin) and the closer point of the object or, if that's too cpu consuming, the closer point of the bounding box.
Also I just have though one thing: The driver should be flexible enough to detect which camera is the active one and then use it for calculating the distance.
Here the file: http://www.pasteall.org/blend/9783
Hi, I am currently investigating how Blender handles LODs because I want to create a video sequence with a lot of meshes (landscape with trees/grass).
Thank you for sharing your knowledge!
About Mip Maps:
As far as I can remember from my studies, mip maps are used to avoid the "http://en.wikipedia.org/wiki/Moir%C3%A9_pattern" on the one hand for single point sampling and to avoid/speed up the sum calculations for textures (you need to calculate the color of a pixel of a textured area by getting the mean color of the area covered by the pixel).
See also: "http://en.wikipedia.org/wiki/Anisotropic_Filtering"
So it is not per se a speed up but an image quality enhancement feature.
LODs are just for speed up specifically - they do not in any sense enhance the quality of a rendered image.
Post a Comment